Jobs
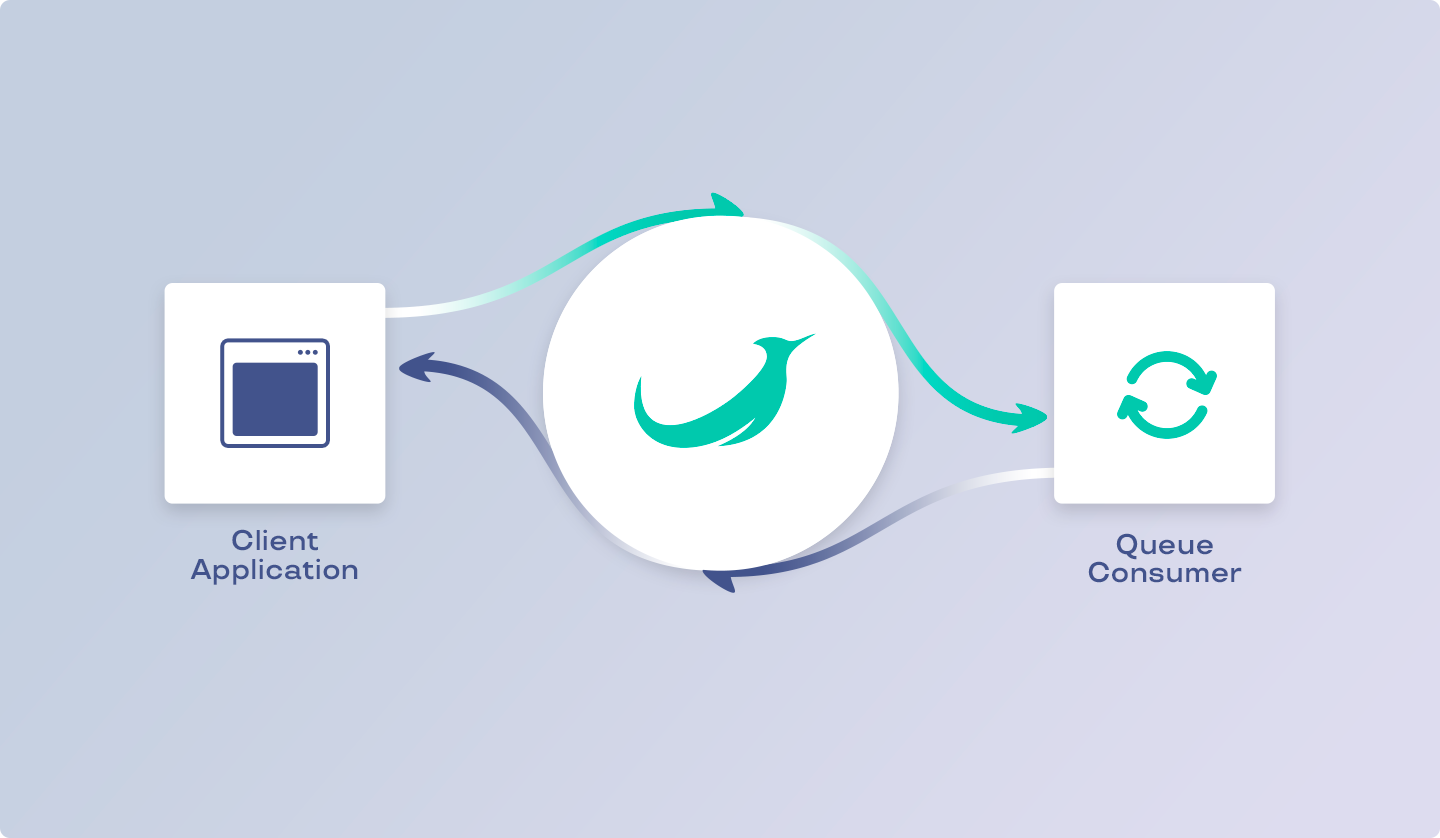
Starting with RoadRunner >= 2.4, a queuing system (aka "jobs") is available. This plugin allows you to move arbitrary "heavy" code into separate tasks to execute them asynchronously in an external worker, which will be referred to as "consumer" in this documentation.
The RoadRunner PHP library provides both API implementations: The client one, which allows you to dispatch tasks, and the server one, which provides the consumer who processes the tasks.
Installation
Requirements
- PHP >= 7.4
- RoadRunner >= 2.4
- ext-protobuf (optional)
To get access from the PHP code, you should put the corresponding dependency using the Composer.
$ composer require spiral/roadrunner-jobs
Configuration
After installing all the required dependencies, you need to configure this
plugin. To enable it add jobs section to your configuration.
For example, in this way, you can configure both the client and server parts to work with RabbitMQ.
version: "2.7"
#
# RPC is required for tasks dispatching (client)
#
rpc:
  listen: tcp://127.0.0.1:6001

#
# This section configures the task consumer (server)
#
server:
  command: php consumer.php
  relay: pipes

#
# In this section, the jobs themselves are configured
#
jobs:
  consume: [ "test" ]   # List of RoadRunner queues that can be processed by
                        # the consumer specified in the "server" section.
  pipelines:
    test:               # RoadRunner queue identifier
      driver: memory    # - Queue driver name
      config:
        priority: 10
        prefetch: 10
-
The
rpcsection is responsible for client settings. It is at this address that we will connect, dispatching tasks to the queue. -
The
serversection is responsible for configuring the server. Previously, we have already met with its description when setting up the PHP Worker. -
And finally, the
jobssection is responsible for the work of the queues themselves. It contains information on how the RoadRunner should work with connections to drivers, what can be handled by the consumer, and other queue-specific settings.
Common Configuration
Let's now focus on the common settings of the queue server. In full, it may look like this:
version: "2.7"

jobs:
  num_pollers: 64
  timeout: 60
  pipeline_size: 100000
  pool:
    num_workers: 10
    allocate_timeout: 60s
    destroy_timeout: 60s
  consume: [ "queue-name" ]
  pipelines:
    queue-name:
      driver: # "[DRIVER_NAME]"
      config: # NEW in 2.7
        # And driver-specific configuration below...
Above is a complete list of all possible common Jobs settings. Let's now figure out what they are responsible for.
-
num_pollers- The number of threads that concurrently read from the priority queue and send payloads to the workers. There is no optimal number, it's heavily dependent on the PHP worker's performance. For example, "echo workers" may process over 300k jobs per second within 64 pollers (on 32 core CPU). -
timeout- The internal timeouts via golang context (in seconds). For example, if the connection was interrupted or your push in the middle of the redial state with 10 minutes timeout (but our timeout is 1 min for example), or queue is full. If the timeout exceeds, your call will be rejected with an error. Default: 60 (seconds). -
pipeline_size- The "binary heaps" priority queue (PQ) settings. Priority queue stores jobs inside according to its' priorities. Priority might be set for the job or inherited by the pipeline. If worker performance is poor, PQ will accumulate jobs untilpipeline_sizewill be reached. After that, PQ will be blocked until workers process all the jobs inside.Blocked PQ means, that you can push the job into the driver, but RoadRunner will not read that job until PQ will be empty. If RoadRunner will be killed with jobs inside the PQ, they won't be lost, because jobs are deleted from the drivers' queue only after Ack.
-
pool- All settings in this section are similar to the worker pool settings described on the configuration page. -
consume- Contains an array of the names of all queues specified in the"pipelines"section, which should be processed by the concierge specified in the global"server"section (see the PHP worker's settings). -
pipelines- This section contains a list of all queues declared in the RoadRunner. The key is a unique queue identifier, and the value is an object from the settings specific to each driver (we will talk about it later).
Memory Driver
This type of driver is already supported by the RoadRunner and does not require any additional installations.
Note that using this type of queue driver, all data is in memory and will be
destroyed when the RoadRunner Server is restarted. If you need persistent
queue, then it is recommended to use alternative drivers: amqp, beanstalk
or sqs.
The complete memory driver configuration looks like this:
version: "2.7"

jobs:
  pipelines:
    # User defined name of the queue.
    example:
      # Required section.
      # Should be "memory" for the in-memory driver.
      driver: memory

      config: # NEW in 2.7
        # Optional section.
        # Default: 10
        priority: 10

        # Optional section.
        # Default: 10
        prefetch: 10
Below is a more detailed description of each of the in-memory-specific options:
-
priority- Queue default priority for each task pushed into this queue if the priority value for these tasks was not explicitly set. Lower value - higher priority. For example, we have 2 pipelines "pipe1" with priority 1 and "pipe10" with priority 10. Jobs from "pipe10" will be taken by workers only if all the jobs from "pipe1" are handled. -
prefetch- A local buffer between the PQ (priority queue) and driver. If the PQ size is set to 100 and prefetch to 100000, you'll be able to push up to prefetch number of jobs even if PQ is full.
Please note that this driver cannot hold more than 1000 tasks with delay at the same time (RR limitation)
Local (based on the boltdb) Driver
This type of driver is already supported by the RoadRunner and does not require any additional installations. It uses boltdb as its main storage for the jobs. This driver should be used locally, for testing or developing purposes. It can be used in the production, but this type of driver can't handle huge load. Maximum RPS it can have no more than 30-50.
Data in this driver persists in the boltdb database file. You can't open same file simultaneously for the 2 pipelines or for the KV plugin and Jobs plugin. This is boltdb limitation on concurrent access from the 2 processes to the same file.
The complete boltdb driver configuration looks like this:
version: "2.7"

boltdb:
  permissions: 0777

jobs:
  pipelines:
    # User defined name of the queue.
    example:
      # Required section.
      # Should be "boltdb" for the local driver.
      driver: boltdb

      config: # NEW in 2.7
        # BoldDB file to create or DB to use
        # Default: "rr.db"
        file: "path/to/rr.db"

        # Optional section.
        # Default: 10
        priority: 10

        # Optional section.
        # Default: 1000
        prefetch: 1000
Below is a more detailed description of each of the in-memory-specific options:
-
priority- Queue default priority for each task pushed into this queue if the priority value for these tasks was not explicitly set. Lower value - higher priority. For example, we have 2 pipelines "pipe1" with priority 1 and "pipe10" with priority 10. Jobs from "pipe10" will be taken by workers only if all the jobs from "pipe1" are handled. -
prefetch- A number of messages to receive from the local queue until ACK/NACK. -
file- boltdb database file to use. Might be a full path with file:/foo/bar/rr1.db. Default:rr.db.
AMQP Driver
Strictly speaking, AMQP (and 0.9.1 version used) is a protocol, not a full-fledged driver, so you can use any servers that support this protocol (on your own, only rabbitmq was tested) , such as: RabbitMQ, Apache Qpid or Apache ActiveMQ. However, it is recommended to use RabbitMQ as the main implementation, and reliable performance with other implementations is not guaranteed.
To install and configure the RabbitMQ, use the corresponding
documentation page. After that, you
should configure the connection to the server in the "amqp" section. This
configuration section contains exactly one addr key with a
connection DSN.
amqp:
  addr: amqp://guest:guest@localhost:5672
After creating a connection to the server, you can create a new queue that will use this connection and which will contain the queue settings (including amqp-specific):
version: "2.7"

amqp:
  addr: amqp://guest:guest@localhost:5672


jobs:
  pipelines:
    # User defined name of the queue.
    example:
      # Driver name
      #
      # This option is required.
      driver: amqp

      # Driver's configuration
      #
      # Should not be empty
      config:

        # QoS - prefetch.
        #
        # Default: 10
        prefetch: 10

        # Pipeline priority
        #
        # If the job has priority set to 0, it will inherit the pipeline's priority. Default: 10.
        priority: 1

        # Consume any payload type (not only Jobs structured)
        #
        # Default: false
        consume_all: false

        # Redial timeout (in seconds). How long to try to reconnect to the AMQP server.
        #
        # Default: 60
        redial_timeout: 60

        # Durable queue
        #
        # Default: false
        durable: false

        # Durable exchange (rabbitmq option: https://www.rabbitmq.com/tutorials/amqp-concepts.html#exchanges)
        #
        # Default: false
        exchange_durable: false

        # Auto-delete (exchange is deleted when last queue is unbound from it): https://www.rabbitmq.com/tutorials/amqp-concepts.html#exchanges
        #
        # Default: false
        exchange_auto_deleted: false

        # Auto-delete (queue that has had at least one consumer is deleted when last consumer unsubscribes) (rabbitmq option: https://www.rabbitmq.com/queues.html#properties)
        #
        # Default: false
        queue_auto_deleted: false

        # Delete queue when stopping the pipeline
        #
        # Default: false
        delete_queue_on_stop: false

        # Queue name
        #
        # Default: default
        queue: test-1-queue

        # Exchange name
        #
        # Default: amqp.default
        exchange: default

        # Exchange type
        #
        # Default: direct.
        exchange_type: direct

        # Routing key for the queue
        #
        # Default: empty.
        routing_key: test

        # Declare a queue exclusive at the exchange
        #
        # Default: false
        exclusive: false

        # When multiple is true, this delivery and all prior unacknowledged deliveries
        # on the same channel will be acknowledged.  This is useful for batch processing
        # of deliveries
        #
        # Default:false
        multiple_ack: false

        # Use rabbitmq mechanism to requeue the job on fail
        #
        # Default: false
        requeue_on_fail: false

        # Queue headers (new in 2.12.2)
        #
        # Default: null
        queue_headers:
          x-queue-mode: lazy
Below is a more detailed description of each of the amqp-specific options:
-
priority- Queue default priority for each task pushed into this queue if the priority value for these tasks was not explicitly set. Lower value - higher priority. For example, we have 2 pipelines "pipe1" with priority 1 and "pipe10" with priority 10. Jobs from "pipe10" will be taken by workers only if all the jobs from "pipe1" are handled. -
prefetch- The client can request that messages be sent in advance so that when the client finishes processing a message, the following message is already held locally, rather than needing to be sent down the channel. Prefetching gives a performance improvement. This field specifies the prefetch window size in octets. See also "prefetch-size" in AMQP QoS documentation reference. -
queue- AMQP internal (inside the driver) queue name. -
consume_all- By default, RR supports onlyJobsstructures from the queue. Set this option to true if you want to also consume the raw payloads. -
exchange- The name of AMQP exchange to which tasks are sent. Exchange distributes the tasks to one or more queues. It routes tasks to the queue based on the created bindings between it and the queue. See also "AMQP model" documentation section. -
exchange_type- The type of task delivery. May be one ofdirect,topics,headersorfanout.-
direct- Used when a task needs to be delivered to specific queues. The task is published to an exchanger with a specific routing key and goes to all queues that are associated with this exchanger with a similar routing key. -
topics- Similarly,directexchange enables selective routing by comparing the routing key. But, in this case, the key is set using a template, like:user.*.messages. -
fanout- All tasks are delivered to all queues even if a routing key is specified in the task. -
headers- Routes tasks to related queues based on a comparison of the (key, value) pairs of the headers property of the binding and the similar property of the message. -
routing_key- Queue's routing key. -
exclusive- Exclusive queues can't be redeclared. If set to true and you'll try to declare the same pipeline twice, that will lead to an error. -
multiple_ack- This delivery and all prior unacknowledged deliveries on the same channel will be acknowledged. This is useful for batch processing of deliveries. Applicable only for the Ack, not for the Nack. -
requeue_on_fail- Requeue on Nack (by RabbitMQ). Docs: https://www.rabbitmq.com/confirms.html#consumer-nacks-requeue -
queue_headers- is used to pass arguments to theQueuecreate method, such asx-queue-mode: lazy
-
NEW in 2.7:
-
durable: create a durable queue. Default: false -
delete_queue_on_stop: delete the queue when the pipeline is stopped. Default: false
NEW in 2.12:
-
redial_timeout: Redial timeout (in seconds). How long to try to reconnect to the AMQP server. -
exchange_durable: Durable exchange (rabbitmq option). Default: false -
exchange_auto_deleted: Auto-delete (exchange is deleted when last queue is unbound from it): link. Default: false -
queue_auto_deleted: Auto-delete (queue that has had at least one consumer is deleted when last consumer unsubscribes): link. Default: false
NEW in 2.12.2:
queue_headers - is used to pass arguments to the Queue create method, such as x-queue-mode: lazy
Beanstalk Driver
Beanstalk is a simple and fast general purpose work queue. To install Beanstalk, you can use the local queue server or run the server inside AWS Elastic. You can choose any option that is convenient for you.
Setting up the server is similar to setting up AMQP and requires specifying the
connection in the "beanstalk" section of your RoadRunner configuration file.
beanstalk:
  addr: tcp://127.0.0.1:11300
After setting up the connection, you can start using it. Let's take a look at the complete config with all the options for this driver:
version: "2.7"

beanstalk:
  # Optional section.
  # Default: tcp://127.0.0.1:11300
  addr: tcp://127.0.0.1:11300

  # Optional section.
  # Default: 30s
  timeout: 10s

jobs:
  pipelines:
    # User defined name of the queue.
    beanstalk-pipeline-name:
      # Required section.
      # Should be "beanstalk" for the Beanstalk driver.
      driver: beanstalk

      config: # NEW in 2.7

        # Optional section.
        # Default: 10
        priority: 10

        # Consume any payload type (not only Jobs structured)
        # Default: false
        consume_all: false

        # Optional section.
        # Default: 1
        tube_priority: 1

        # Optional section.
        # Default: default
        tube: default

        # Optional section.
        # Default: 5s
        reserve_timeout: 5s
These are all settings that are available to you for configuring this type of driver. Let's take a look at what they are responsible for:
-
priority- Similar to the same option in other drivers. This is queue default priority for each task pushed into this queue if the priority value for these tasks was not explicitly set. Lower value - higher priority. -
tube_priority- The value for specifying the priority within Beanstalk is the internal priority of the server. The value should not exceedint32size. -
tube- The name of the inner "tube" specific to the Beanstalk driver. -
consume_all- By default, RR supports onlyJobsstructures from the queue. Set this option to true if you want to also consume the raw payloads.
SQS Driver
Amazon SQS (Simple Queue Service) is an alternative queue server also developed by Amazon and is also part of the AWS service infrastructure. If you prefer to use the "cloud" option, then you can use the ready-made documentation for its installation.
In addition to the possibility of using this queue server within the AWS, you can also use the local installation of this system on your own servers. If you prefer this option, then you can use softwaremill's implementation of the Amazon SQS server.
After you have created the SQS server, you need to specify the following
connection settings in sqs configuration settings. Unlike AMQP and Beanstalk,
SQS requires more values to set up a connection and will be different from what
we're used to:
sqs:
  # Required AccessKey ID.
  # Default: empty
  key: access-key

  # Required secret access key.
  # Default: empty
  secret: api-secret

  # Required AWS region.
  # Default: empty
  region: us-west-1

  # Required AWS session token.
  # Default: empty
  session_token: test

  # Required AWS SQS endpoint to connect.
  # Default: http://127.0.0.1:9324
  endpoint: http://127.0.0.1:9324
Please note that although each of the sections contains default values, it is marked as "required". This means that in almost all cases they are required to be specified in order to correctly configure the driver.
After you have configured the connection - you should configure the queue that will use this connection:
NOTE:
You may also skip the whole sqs configuration section (global, not the pipeline) to use the AWS IAM credentials if the RR is inside the EC2 machine. RR will try to detect env automatically by making an http request to the http://169.254.169.254/latest/dynamic/instance-identity/ as pointer here: link
version: "2.7"

sqs:
  # SQS connection configuration...

jobs:
  pipelines:
    test-sqs-pipeline:
      # Required section.
      # Should be "sqs" for the Amazon SQS driver.
      driver: sqs

      config:
        # Optional section.
        # Default: 10
        prefetch: 10

        # Consume any payload type (not only Jobs structured)
        # Default: false
        consume_all: false

        # Get queue URL only
        # Default: false
        skip_queue_declaration: false

        # Optional section.
        # Default: 0
        visibility_timeout: 0

        # Optional section.
        # Default: 0
        wait_time_seconds: 0

        # Optional section.
        # Default: default
        queue: default

        # Optional section.
        # Default: empty
        attributes:
          DelaySeconds: 42
          # etc... see https://docs.aws.amazon.com/AWSSimpleQueueService/latest/APIReference/API_SetQueueAttributes.html

        # Optional section.
        # Default: empty
        tags:
          test: "tag"
Below is a more detailed description of each of the SQS-specific options:
-
prefetch- Number of jobs to prefetch from the SQS until ACK/NACK. Default:10. -
visibility_timeout- The duration (in seconds) that the received messages are hidden from subsequent retrieve requests after being retrieved by a ReceiveMessage request. Max value is 43200 seconds (12 hours). Default:0. -
wait_time_seconds- The duration (in seconds) for which the call waits for a message to arrive in the queue before returning. If a message is available, the call returns sooner than WaitTimeSeconds. If no messages are available and the wait time expires, the call returns successfully with an empty list of messages. Default:5. -
queue- SQS internal queue name. Can contain alphanumeric characters, hyphens (-), and underscores (_). Default value is"default"string. -
skip_queue_declaration- By default, RR tries to declare the queue by default and then gets the queue URL. Set this option totrueif the user already declared the queue to only get its URL. -
consume_all- By default, RR supports onlyJobsstructures from the queue. Set this option to true if you want to also consume the raw payloads. -
attributes- List of the AWS SQS attributes.
For example
yamlattributes: DelaySeconds: 0 MaximumMessageSize: 262144 MessageRetentionPeriod: 345600 ReceiveMessageWaitTimeSeconds: 0 VisibilityTimeout: 30
-
tags- Tags don't have any semantic meaning. Amazon SQS interprets tags as character.
Please note that this functionality is rarely used and slows down the work of queues: https://docs.aws.amazon.com/AWSSimpleQueueService/latest/SQSDeveloperGuide/sqs-queue-tags.html
NATS Driver
NATS driver supported in the RR starting from the v2.5.0 and includes only NATS JetStream support.
The complete NATS driver configuration looks like this:
version: "2.7"

nats:
  addr: "demo.nats.io"

jobs:
  num_pollers: 10
  pipeline_size: 100000
  pool:
    num_workers: 10
    max_jobs: 0
    allocate_timeout: 60s
    destroy_timeout: 60s

  pipelines:
    test-1:
      driver: nats
      config:
        # Pipeline priority
        # If the job has priority set to 0, it will inherit the pipeline's priority. Default: 10.
        priority: 2

        # NATS prefetch
        # Messages to read into the channel
        prefetch: 100

        # Consume any payload type (not only Jobs structured)
        # Default: false
        consume_all: false

        # NATS subject
        # Default: default
        subject: default

        # NATS stream
        # Default: default-stream
        stream: foo

        # The consumer will only start receiving messages that were created after the consumer was created
        # Default: false (deliver all messages from the stream beginning)
        deliver_new: true

        # Consumer rate-limiter in bytes https://docs.nats.io/jetstream/concepts/consumers#ratelimit
        # Default: 1000
        rate_limit: 100

        # Delete the stream when after pipeline was stopped
        # Default: false
        delete_stream_on_stop: false

        # Delete message from the stream after successful acknowledge
        # Default: false
        delete_after_ack: false
Below is a more detailed description of each of the in-memory-specific options:
-
subject- nats subject. -
stream- stream name. -
deliver_new- the consumer will only start receiving messages that were created after the consumer was created. -
rate_limit- NATS rate limiter. -
delete_stream_on_stop- delete the whole stream when pipeline stopped. -
delete_after_ack- delete message after it successfully acknowledged. -
consume_all- By default, RR supports onlyJobsstructures from the queue. Set this option to true if you want to also consume the raw payloads.
Kafka driver
Kafka driver supported from the RoadRunner version 2.11.0. In the v2023.1.0 Kafka driver was reworked.
Apache Kafka is a distributed streaming system used for event stream processing, real-time data pipelines, and stream processing at scale.
Originally created and open-sourced at LinkedIn in 2011, Kafka has quickly evolved from a messaging queue to a full-fledged event streaming platform.
Used by 80% of the Fortune 500, today, Kafka brings numerous advantages for virtually every industry, opening countless new use cases big and small.
Configuration:
# Kafka jobs driver
#
# This option is required to use Kafka driver. Addrs can contain any number of addresses separated by comma (127.0.0.1:9092,127.0.0.1:9093,...)
kafka:
  addrs: 127.0.0.1:9092

jobs:
  num_pollers: 10
  pipeline_size: 100000
  pool:
    num_workers: 10
    max_jobs: 0
    allocate_timeout: 60s
    destroy_timeout: 60s

  pipelines:
    test-local-6:
      # Driver name
      #
      # This option is required
      driver: kafka

      # Driver's configuration
      #
      # Should not be empty
      config:

        # Pipeline priority
        #
        # If the job has priority set to 0, it will inherit the pipeline's priority. Default: 10.
        priority: 1

        # Topic name: https://kafka.apache.org/intro#intro_concepts_and_terms
        #
        # This option is required and should not be empty.
        topic: test-1

        # Kafka brokers, array. If there is no port specified, 9092 will be used as default
        #
        # Required, no default
        brokers: [ 127.0.0.1:9092 ]

        # SASL authentication options to use for all connections. Depending on the auth type, plain or aws_msk_plain sections might be removed.
        #
        # Optional, default: empty
        sasl:

          # PLAIN auth section -----

          # Mechanism used for the authentication
          #
          # Required for the section. Might be: 'aws_msk_iam' or 'plain'
          mechanism: plain

          # Username to use for authentication.
          #
          # Required for the plain auth mechanism.
          username: foo

          # Password to use for authentication.
          #
          # Required for the plain auth mechanism.
          password: bar

          # Zid is an optional authorization ID to use in authenticating.
          #
          # Optional, default: empty.
          zid: "foo"

          # AWS_MSK_IAM auth section -----

          # AWS Access key ID.
          #
          # Required
          access_key: foo

          # AWS Secret Access Key.
          #
          #
          secret_key: bar

          # SessionToken, if non-empty, is a session / security token to use for authentication.
          # See the following link for more details:
          #
          # https://docs.aws.amazon.com/STS/latest/APIReference/welcome.html
          session_token: bar


          # UserAgent is the user agent to for the client to use when connecting
          # to Kafka, overriding the default "franz-go/<runtime.Version()>/<hostname>".
          # Setting a UserAgent allows authorizing based on the aws:UserAgent
          # condition key; see the following link for more details:
          #     https://docs.aws.amazon.com/IAM/latest/UserGuide/reference_policies_condition-keys.html#condition-keys-useragent
          user_agent: baz

        # Auto create topic for the consumer/producer
        #
        # Optional, default: false
        auto_create_topics_enable: false

        # Kafka producer options
        #
        # Optional, required only if Push/PushBatch is used.
        producer_options:

          # disable_idempotent disables idempotent produce requests, opting out of
          # Kafka server-side deduplication in the face of reissued requests due to
          # transient network problems.
          # Idempotent production is strictly a win, but does require the IDEMPOTENT_WRITE permission on CLUSTER
          # (pre Kafka 3.0), and not all clients can have that permission.
          #
          # Optional, defaut: false
          disable_idempotent: false

          # required_acks sets the required acks for produced records.
          #
          # Optional, default: AllISRAcks. Possible values: NoAck, LeaderAck, AllISRAck
          required_acks: AllISRAck

          # max_message_bytes upper bounds the size of a record batch, overriding the default 1,000,012 bytes.
          # This mirrors Kafka's max.message.bytes.
          #
          # Optional, default: 1000012
          max_message_bytes: 1000012

          # request_timeout sets how long Kafka broker's are allowed to respond produce requests, overriding the default 10s.
          # If a broker exceeds this duration, it will reply with a request timeout error.
          #
          # Optional, default: 10s. Possible values: 10s, 10m.
          request_timeout: 10s

          # delivery_timeout sets a rough time of how long a record can sit around in a batch before timing out,
          # overriding the unlimited default. If idempotency is enabled (as it is by default), this option is only
          # enforced if it is safe to do so without creating invalid sequence numbers.
          #
          # Optional, default: delivery.timeout.ms Kafka option. Possible values: 10s, 10m.
          delivery_timeout: 100s

          # transaction_timeout sets the allowed for a transaction, overriding the default 40s. It is a good idea to
          # keep this less than a group's session timeout.
          #
          # Optional, default 40s. Possible values: 10s, 10m.
          transaction_timeout: 100

          # compression_codec sets the compression codec to use for producing records.
          #
          # Optional, default is chosen in the order preferred based on broker support. Possible values: gzip, snappy, lz4, zstd.
          compression_codec: gzip

        # Kafka Consumer options. Needed to consume messages from the Kafka cluster.
        #
        # Optional, needed only if `consume` is used.
        consumer_options:

          # topics: adds topics to use for consuming
          #
          # Default: empty (will produce an error), possible to use regexp if `consume_regexp` is set to true.
          topics: [ "foo", "bar", "^[a-zA-Z0-9._-]+$" ]

          # consume_regexp sets the client to parse all topics passed to `topics` as regular expressions.
          # When consuming via regex, every metadata request loads *all* topics, so that all topics can be passed to
          # any regular expressions. Every topic is evaluated only once ever across all regular expressions; either it
          # permanently is known to match, or is permanently known to not match.
          #
          # Optional, default: false.
          consume_regexp: true

          # max_fetch_message_size sets the maximum amount of bytes a broker will try to send during a fetch, overriding the default 50MiB.
          # Note that brokers may not obey this limit if it has records larger than this limit.
          # Also note that this client sends a fetch to each broker concurrently, meaning the client will
          # buffer up to <brokers * max bytes> worth of memory. This corresponds to the Java fetch.max.bytes setting.
          #
          # Optional, default 50000
          max_fetch_message_size: 50000

          # min_fetch_message_size sets the minimum amount of bytes a broker will try to send during a fetch,
          # overriding the default 1 byte. With the default of 1, data is sent as soon as it is available.
          # This corresponds to the Java fetch.min.bytes setting.
          #
          # Optional, default: 1.
          min_fetch_message_size: 1

          # consume_partitions sets partitions to consume from directly and the offsets to start consuming those partitions from.
          # This option is basically a way to explicitly consume from subsets of partitions in topics, or to consume at exact offsets.
          #
          # NOTE: This option is not compatible with group consuming and regex consuming.
          #
          # Optional, default: empty
          consume_partitions:

            # Topic for the consume_partitions
            #
            # Optional, default: empty.
            foo:

              # Partition for the topic.
              #
              # Optional, default: empty.
              0:

                # Partition offset.
                #
                # Required if all options is used. No default, error on empty.
                # Possible values: AtEnd, At, AfterMilli, AtStart, Relative, WithEpoch
                type: AtStart

                # Value for the: At, AfterMilli, Relative and WithEpoch offsets.
                #
                # Optional, default: 0.
                value: 1

          # consumer_offset sets the offset to start consuming from, or if OffsetOutOfRange is seen while fetching,
          # to restart consuming from.
          #
          # Optional, default: AtStart
          consumer_offset:

            # Partition offset.
            #
            # Optional, default: AtStart. Possible values: AtEnd, At, AfterMilli, AtStart, Relative, WithEpoch
            type: AtStart

            # Value for the: At, AfterMilli, Relative and WithEpoch offsets.
            #
            # Optional, default: 0.
            value: 1

        # group_options sets the consumer group for the client to join and consume in.
        # This option is required if using any other group options.
        #
        # Default: empty.
        group_options:

          # group_id sets the group to consume.
          #
          # Required if using group consumer.
          group_id: foo

          # block_rebalance_on_poll switches the client to block rebalances whenever you poll.
          #
          # Optional, default: false.
          block_rebalance_on_poll: true
Client (Producer)
Now that we have configured the server, we can start writing our first code for
sending the task to the queue. But before doing this, we need to connect to our
server. And to do this, it is enough to create a Jobs instance.
// Server Connection
$jobs = new Spiral\RoadRunner\Jobs\Jobs();
Please note that in this case we have not specified any connection settings. And this is really not required if this code is executed in a RoadRunner environment. However, in the case that a connection is required to be established from a third-party application (for example, a CLI command), then the settings must be specified explicitly.
$jobs = new Spiral\RoadRunner\Jobs\Jobs(
    // Expects RPC connection
    Spiral\Goridge\RPC\RPC::create('tcp://127.0.0.1:6001')
);
After we have established the connection, we should check the server
availability and in this case the API availability for the jobs. This can be
done using the appropriate isAvailable() method.
Note
, that this method will always return anExceptionbecause it was removed from the RR RPC sincev2.6.2, issue. In the releases afterv2.6.2you can safely remove calls to that method.
When the connection is created, and the availability of the functionality is checked, we can connect to the queue we
need using connect() method.
$jobs = new Spiral\RoadRunner\Jobs\Jobs();

// Be careful, isAvailable method doesn't work after v2.6.2
if (!$jobs->isAvailable()) {
    throw new LogicException('The server does not support "jobs" functionality =(');
}

$queue = $jobs->connect('queue-name');
Task Creation
Before submitting a task to the queue, you should create this task. To create a
task, it is enough to call the corresponding create() method.
$task = $queue->create(SendEmailTask::class);
// Expected:
// object(Spiral\RoadRunner\Jobs\Task\PreparedTaskInterface)
Note that the name of the task does not have to be a class. Here we are using
SendEmailTaskjust for convenience.
Also, this method takes an additional second argument with additional data to complete this task.
$task = $queue->create(
  SendEmailTask::class,
  payload: ['email' => 'dev@null.pipe']
);
You can also use this task as a basis for creating several others.
$task = $queue->create(SendEmailTask::class);

$first = $task->withValue('john.doe@example.com');
$second = $task->withValue('john.snow@the-wall.north');
In addition, the method takes an additional third argument with Spiral\RoadRunner\Jobs\OptionsInterface
where you can pass object with predefined options.
$options = new \Spiral\RoadRunner\Jobs\Options(autoAck: true);

$task = $queue->create(
  SendEmailTask::class,
  options: $options->withDelay(10)
);
You can also redefine options for created task.
$options = new \Spiral\RoadRunner\Jobs\Options(autoAck: true);

$task = $queue->create(SendEmailTask::class);

$task = $task->withOptions($options);
Task creation for Kafka driver
Please note, a queue with Kafka driver requires a task with specified topic. In this case
you have to use Spiral\RoadRunner\Jobs\KafkaOptionsInterface, because it has all required
methods for working with Kafka driver. Connect to queue using Spiral\RoadRunner\Jobs\KafkaOptionsInterface.
To redefine this options for a particular message, simply pass another Spiral\RoadRunner\Jobs\KafkaOptionsInterface
implementation as a second parameter of the create method.
$options = new \Spiral\RoadRunner\Jobs\KafkaOptions(topic: 'topic_name');

$queue = $jobs->connect('queue_name', $options);

$task = $queue->create(
  SendEmailTask::class,
  options: $options->withPartition(10)->withOffset(1)->withMetadata('foo=bar')
);
As you noticed we use everywhere interfaces for setting options for the task, and a developer has the ability create his own implementation of the interfaces.
Task Dispatching
And to send tasks to the queue, we can use different methods:
dispatch() and dispatchMany(). The difference between these two
implementations is that the first one sends a task to the queue, returning a
dispatched task object, while the second one dispatches multiple tasks,
returning an array. Moreover, the second method provides one-time delivery of
all tasks in the array, as opposed to sending each task separately.
$a = $queue->create(SendEmailTask::class, ['email' => 'john.doe@example.com']);
$b = $queue->create(SendEmailTask::class, ['email' => 'john.snow@the-wall.north']);

foreach ([$a, $b] as $task) {
    $result = $queue->dispatch($task);
    // Expected:
    // object(Spiral\RoadRunner\Jobs\Task\QueuedTaskInterface)
}

// Using a batching send
$result = $queue->dispatchMany($a, $b);
// Expected:
// array(2) {
//    object(Spiral\RoadRunner\Jobs\Task\QueuedTaskInterface),
//    object(Spiral\RoadRunner\Jobs\Task\QueuedTaskInterface)
// }
Task Immediately Dispatching
In the case that you do not want to create a new task and then immediately
dispatch it, you can simplify the work by using the push method. However, this
functionality has a number of limitations. In case of creating a new task:
- You can flexibly configure additional task capabilities using a convenient fluent interface.
- You can prepare a common task for several others and use it as a basis to create several alternative tasks.
- You can create several different tasks and collect them into one collection and send them to the queue at once (using the so-called batching).
In the case of immediate dispatch, you will have access to only the basic
features: The push() method accepts one required argument with the
name of the task and two optional arguments containing additional data for the
task being performed and additional sending options (for example, a delay).
Moreover, this method is designed to send only one task.
use Spiral\RoadRunner\Jobs\Options;

$payload = ['email' => $email, 'message' => $message];

$task = $queue->push(SendEmailTask::class, $payload, new Options(
    delay: 60 // in seconds
));
Task Payload
As you can see, each task, in addition to the name, can contain additional data (payload) specific to a certain type of task. You yourself can determine what data should be transferred to the task and no special requirements are imposed on them, except for the main ones: Since this task is then sent to the queue, they must be serializable.
The default serializer used in jobs allows you to pass anonymous functions as well.
In case to add additional data, you can use the optional second argument
provided by the create() and push() methods, or you can use the fluent
interface to supplement or modify the task data. Everything is quite simple
here; you can add data using the withValue() method, or delete them using the
withoutValue() method.
The first argument of the withValue() method passes a payload value as the
required first argument. If you also need to specify a key for it, just pass it
as an optional second argument.
$task = $queue->create(CreateBackup::class)
    ->withValue('/var/www')
    ->withValue(42, 'answer')
    ->withValue('/dev/null', 'output');

// An example like this will be completely equivalent to if we passed
// all this data at one time
$task = $queue->create(CreateBackup::class, [
    '/var/www',
    'answer' => 42,
    'output' => '/dev/null'
]);

// On the other hand, we don't need an "answer"...
$task = $task->withoutValue('answer');
Task Headers
In addition to the data itself, we can send additional metadata that is not related to the payload of the task, that is, headers. In them, we can pass any additional information, for example: Encoding of messages, their format, the server's IP address, the user's token or session id, etc.
Headers can only contain string values and are not serialized in any way during transmission, so be careful when specifying them.
In the case to add a new header to the task, you can use methods similar to PSR-7. That is:
-
withHeader(string, iterable<string>|string): self- Return an instance with the provided value replacing the specified header. -
withAddedHeader(string, iterable<string>|string): self- Return an instance with the specified header appended with the given value. -
withoutHeader(string): self- Return an instance without the specified header.
$task = $queue->create(RestartServer::class)
    ->withValue('addr', '127.0.0.1')
    ->withAddedHeader('access-token', 'IDDQD');

$queue->dispatch($task);
Task Delayed Dispatching
If you want to specify that a job should not be immediately available for processing by a jobs worker, you can use the delayed job option. For example, let's specify that a job shouldn't be available for processing until 42 minutes after it has been dispatched:
$task = $queue->create(SendEmailTask::class)
    ->withDelay(42 * 60); // 42 min * 60 sec
Consumer Usage
You probably already noticed that when setting up a jobs consumer,
the "server" configuration section is used in which a PHP file-handler is defined.
Exactly the same one we used earlier to write a HTTP Worker.
Does this mean that if we want to use the Jobs Worker, then we can no longer
use the HTTP Worker? No it does not!
During the launch of the RoadRunner, it spawns several workers defined in the
"server" config section (by default, the number of workers is equal to the
number of CPU cores). At the same time, during the spawn of the workers, it
transmits in advance to each of them information about the mode in which this
worker will be used. The information about the mode itself is contained in the
environment variable RR_ENV and for the HTTP worker the value will correspond
to the "http", and for the Jobs worker the value of "jobs" will be stored
there.
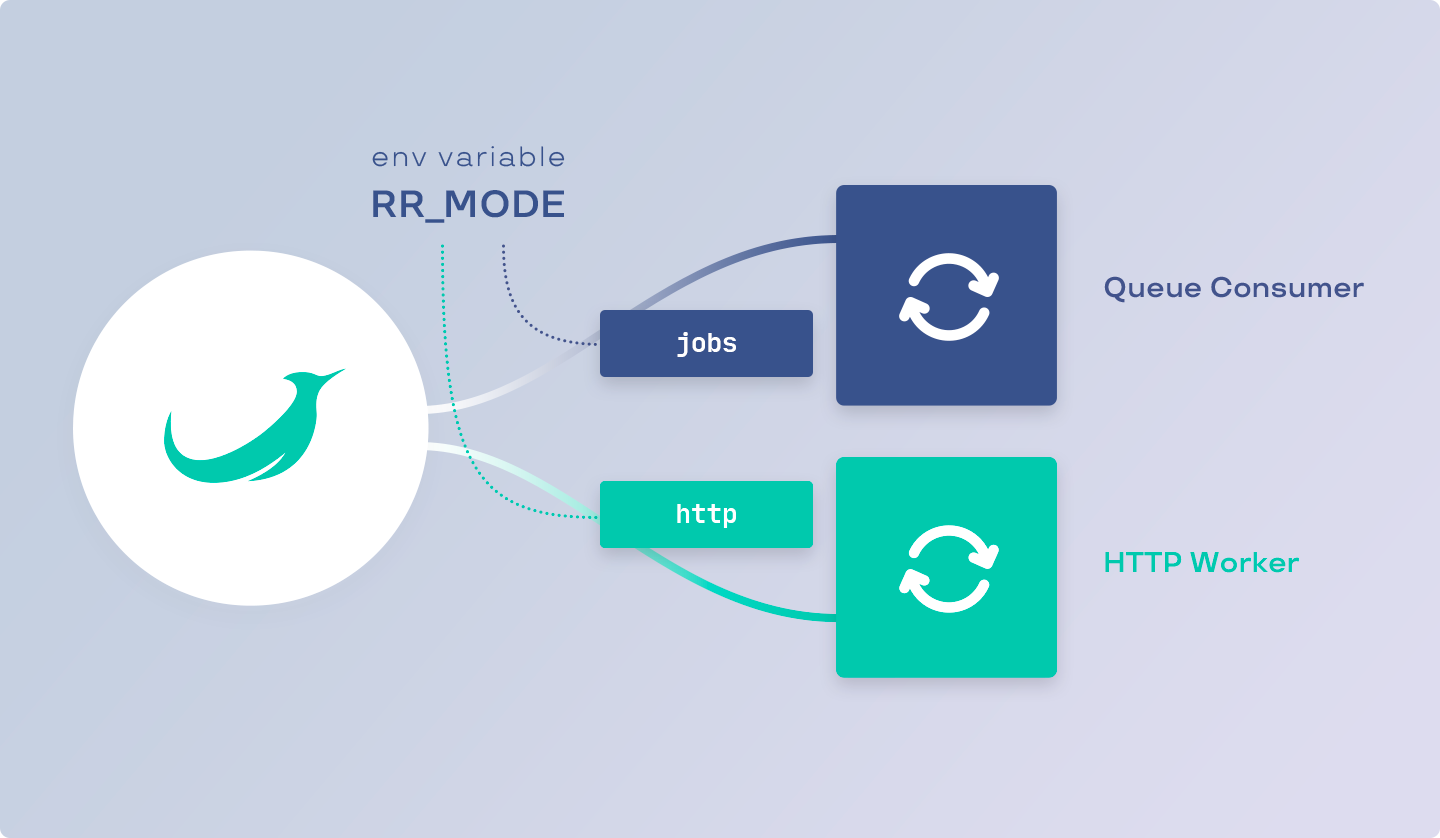
There are several ways to check the operating mode from the code:
- By getting the value of the env variable.
- Or using the appropriate API method (from the
spiral/roadrunner-workerpackage).
The second choice may be more preferable in cases where you need to change the RoadRunner's mode, for example, in tests.
use Spiral\RoadRunner\Environment;
use Spiral\RoadRunner\Environment\Mode;

// 1. Using global env variable
$isJobsMode = $_SERVER['RR_MODE'] === 'jobs';

// 2. Using RoadRunner's API
$env = Environment::fromGlobals();

$isJobsMode = $env->getMode() === Mode::MODE_JOBS;
After we are convinced of the specialization of the worker, we can write the
corresponding code for processing tasks. To get information about the available
task in the worker, use the
$consumer->waitTask(): ReceivedTaskInterface method.
use Spiral\RoadRunner\Jobs\Consumer;
use Spiral\RoadRunner\Jobs\Task\ReceivedTaskInterface;


$consumer = new Consumer();

/** @var Spiral\RoadRunner\Jobs\Task\ReceivedTaskInterface $task */
while ($task = $consumer->waitTask()) {
    var_dump($task);
}
After you receive the task from the queue, you can start processing it in accordance with the requirements. Don't worry about how much memory or time this execution takes - the RoadRunner takes over the tasks of managing and distributing tasks among the workers.
After you have processed the incoming task, you can execute the
complete(): void method. After that, you tell the RoadRunner that you are
ready to handle the next task.
$consumer = new Spiral\RoadRunner\Jobs\Consumer();

while ($task = $consumer->waitTask()) {

    //
    // Task handler code
    //

    $task->complete();
}
We got acquainted with the possibilities of receiving and processing tasks, but we do not yet know what the received task is. Let's see what data it contains.
Task Failing
In some cases, an error may occur during task processing. In this case, you
should use the fail() method, informing the RoadRunner about it. The method
takes two arguments. The first argument is required and expects any string or
string-like (instance of Stringable, for example any exception) value with an
error message. The second is optional and tells the server to restart this task.
$consumer = new Spiral\RoadRunner\Jobs\Consumer();
$shouldBeRestarted = false;

while ($task = $consumer->waitTask()) {
    try {
        //
        // Do something...
        //
        $task->complete();
    } catch (\Throwable $e) {
        $task->fail($e, $shouldBeRestarted);
    }
}
In the case that the next time you restart the task, you should update the headers, you can use the appropriate method by adding or changing the headers of the received task.
$task
    ->withHeader('attempts', (int)$task->getHeaderLine('attempts') - 1)
    ->withHeader('retry-delay', (int)$task->getHeaderLine('retry-delay') * 2)
    ->fail('Something went wrong', requeue: true)
;
In addition, you can re-specify the task execution delay. For example, in the
code above, you may have noticed the use of a custom header "retry-delay", the
value of which doubled after each restart, so this value can be used to specify
the delay in the next task execution.
$task
    ->withDelay((int)$task->getHeaderLine('retry-delay'))
    ->fail('Something went wrong', true)
;
Received Task ID
Each task in the queue has a unique identifier. This allows you to unambiguously identify the task among all existing tasks in all queues, no matter what name it was received from.
In addition, it is worth paying attention to the fact that the identifier is not a sequential number that increases indefinitely. It means that there is still a chance of an identifier collision, but it is about 1/2.71 quintillion. Even if you send 1 billion tasks per second, it will take you about 85 years for an ID collision to occur.
echo $task->getId();
// Expected Result
// string(36) "88ca6810-eab9-473d-a8fd-4b4ae457b7dc"
In the case that you want to store this identifier in the database, it is recommended to use a binary representation (16 bytes long if your DB requires blob sizes).
$binary = hex2bin(str_replace('-', '', $task->getId()));
// Expected Result
// string(16) b"ˆÊh\x10ê¹G=¨ýKJäW·Ü"
Received Task Queue
Since a worker can process several different queues at once, you may need to
somehow determine from which queue the task came. To get the name of the queue,
use the getQueue(): string method.
echo $task->getQueue();
// Expected
// string(13) "example-queue"
For example, you can select different task handlers based on different types of queues.
// This is just an example of a handler
$handler = $container->get(match($task->getQueue()) {
    'emails'  => 'email-handler',
    'billing' => 'billing-handler',
    default   => throw new InvalidArgumentException('Unprocessable queue [' . $task->getQueue() . ']')
});

$handler->process($task);
Task auto acknowledge
RoadRunner version v2.10.0+ supports an auto acknowledge task option. You might use this option to acknowledge a task right after RR receive it from the queue.
You can use this option for the non-important tasks which can fail or break the worker.
To use this option you may update the Options:
// Create with default values
$options = new Options(
     Options::DEFAULT_DELAY,
     Options::DEFAULT_PRIORITY,
     Options::DEFAULT_AUTO_ACK, // false by default
);
Or manage that manually per every Task:
use Spiral\RoadRunner\Jobs\Queue\MemoryCreateInfo;
use Spiral\RoadRunner\Jobs\Options;
use Spiral\RoadRunner\Jobs\Jobs;

$options = new Options();

// Jobs service
$jobs = new Jobs(RPC::create('tcp://127.0.0.1:6001'));

// Select "test" queue from jobs
$queue = $jobs->connect('test');

// or create a new queue
$queue = $jobs->create(new MemoryCreateInfo('local'));

// Set default auto ack for all tasks
$queue = $queue->withDefaultOptions(
     $options->withAutoAck(true)
);

// Create a new task with custom auto ack
$task = $queue->push('task_name', ['foo' => 'bar'], (new Options())->withAutoAck(false));

// or change auto ack for created task
$task = $queue->create('task_name', ['foo' => 'bar'])->withAutoAck(false);
$queue->dispatch($task);
Received Task Name
The task name is some identifier associated with a specific type of task. For
example, it may contain the name of the task class so that in the future we can
create an object of this task by passing the required data there. To get the
name of the task, use the getName(): string method.
echo $task->getName();
// Expected
// string(21) "App\\Queue\\Task\\EmailTask"
Thus, we can implement the creation of a specific task with certain data for this task.
$class = $task->getName();

if (!class_exists($class)) {
    throw new InvalidArgumentException("Unprocessable task [$class]");
}

$handler->process($class::fromTask($task));
Received Task Payload
Each task contains a set of arbitrary user data to be processed within the task. To obtain this data, you can use one of the available methods:
getValue
Method getValue() returns a specific payload value by key or null if no
value was passed. If you want to specify any other default value (for those
cases when the payload with the identifier was not passed), then use the second
argument, passing your own default value there.
if ($task->getName() !== SendEmailTask::class) {
    throw new InvalidArgumentException('Does not look like a mail task');
}

echo $task->getValue('email');              // "john.doe@example.com"
echo $task->getValue('username', 'Guest');  // "John"
hasValue
To check the existence of any value in the payload, use the hasValue() method.
This method will return true if the value for the payload was passed and false
otherwise.
if (!$task->hasValue('email')) {
    throw new InvalidArgumentException('The "email" value is required for this task');
}

$email->sendTo($task->getValue('email'));
getPayload
Also you can get all data at once in array(string|int $key => mixed $value)
format using the getPayload method. This method may be useful to you in cases
of transferring all data to the DTO.
$class = $task->getName();
$arguments = $task->getPayload();

$dto = new $class(...$arguments);
You should pay attention that an array can contain both int and string
keys, so you should take care of their correct pass to the constructor
yourself. For example, the code above will work completely correctly only in the
case of PHP >= 8.1. And in the case of earlier versions of the language, you
should use the reflection functionality,
or pass the payload in some other way.
Since the handler process is not the one that put this task in the queue, then
if you send any object to the queue, it will be serialized and then automatically
unpacked in the handler. The default serializer suitable for most cases, so you
can even pass Closure instances. However, in the case of any specific data
types, you should manage their packing and unpacking yourself, either by
replacing the serializer completely, or for a separate value. In this case, do
not forget to specify this both on the client and consumer side.
Received Task Headers
In the case that you need to get any additional information that is not related to the task, then for this you should use the functionality of headers.
For example, headers can convey information about the serializer, encoding, or other metadata.
$message = $task->getValue('message');
$encoding = $task->getHeaderLine('encoding');

if (strtolower($encoding) !== 'utf-8') {
    $message = iconv($encoding, 'utf-8', $message);
}
The interface for receiving headers is completely similar to PSR-7, so methods are available to you:
-
getHeaders(): array<string, array<string, string>>- Retrieves all task header values. -
hasHeader(string): bool- Checks if a header exists by the given name. -
getHeader(string): array<string, string>- Retrieves a message header value by the given name. -
getHeaderLine(string): string- Retrieves a comma-separated string of the values for a single header by the given name.
We got acquainted with the data and capabilities that we have in the consumer. Let's now get down to the basics - sending these messages.
Advanced Functionality
In addition to the main functionality of queues for sending and processing in API has additional functionality that is not directly related to these tasks. After we have examined the main functionality, it's time to disassemble the advanced features.
Creating A New Queue
In the very first chapter, we got acquainted
with the queue settings and drivers for them. In approximately the same way, we
can do almost the same thing with the help of the PHP code using create()
method through Jobs instance.
To create a new queue, the following types of DTO are available to you:
-
Spiral\RoadRunner\Jobs\Queue\AMQPCreateInfofor AMQP queues. -
Spiral\RoadRunner\Jobs\Queue\BeanstalkCreateInfofor Beanstalk queues. -
Spiral\RoadRunner\Jobs\Queue\MemoryCreateInfofor in-memory queues. -
Spiral\RoadRunner\Jobs\Queue\SQSCreateInfofor SQS queues. -
Spiral\RoadRunner\Jobs\Queue\KafkaCreateInfofor Kafka queues. -
Spiral\RoadRunner\Jobs\Queue\BoltdbCreateInfofor Boltdb queues.
Such a DTO with the appropriate settings should be passed to the create()
method to create the corresponding queue:
use Spiral\RoadRunner\Jobs\Jobs;
use Spiral\RoadRunner\Jobs\Queue\MemoryCreateInfo;

$jobs = new Jobs();

//
// Create a new "example" in-memory queue
//
$queue = $jobs->create(new MemoryCreateInfo(
    name: 'example',
    priority: 42,
    prefetch: 10,
));
Getting A List Of Queues
In that case, to get a list of all available queues, you just need to use the
standard functionality of the foreach operator. Each element of this collection
will correspond to a specific queue registered in the RoadRunner. And to simply
get the number of all available queues, you can pass a Job object to the
count() function.
$jobs = new Spiral\RoadRunner\Jobs\Jobs();

foreach ($jobs as $queue) {
    var_dump($queue->getName());
    // Expects name of the queue
}

$count = count($jobs);
// Expects the number of a queues
Pausing A Queue
In addition to the ability to create new queues, there may be times when a queue needs to be suspended for processing. Such cases can arise, for example, in the case of deploying a new application, when the processing of tasks should be suspended during the deployment of new application code.
In this case, the code will be pretty simple. It is enough to call the pause()
method, passing the names of the queues there. In order to start the work of
queues further (unpause), you need to call a similar resume() method.
$jobs = new Spiral\RoadRunner\Jobs\Jobs();

// Pause "emails", "billing" and "backups" queues.
$jobs->pause('emails', 'billing', 'backups');

// Resuming only "emails" and "billing".
$jobs->resume('emails', 'billing');
RPC Interface
All communication between PHP and GO made by the RPC calls with protobuf payloads. You can find versioned proto-payloads here: Proto.
-
Push(in *jobsv1beta.PushRequest, out *jobsv1beta.Empty) error- The arguments: the first argument is aPushRequest, which contains one field of theJobbeing sent to the queue; the second argument isEmpty, which means that the function does not return a result (returns nothing). The error returned if the request fails. -
PushBatch(in *jobsv1beta.PushBatchRequest, out *jobsv1beta.Empty) error- The arguments: the first argument is aPushBatchRequest, which contains one repeated (list) field of theJobbeing sent to the queue; the second argument isEmpty, which means that the function does not return a result. The error returned if the request fails. -
Pause(in *jobsv1beta.Pipelines, out *jobsv1beta.Empty) error- The arguments: the first argument is aPipelines, which contains one repeated (list) field with thestringnames of the queues to be paused; the second argument isEmpty, which means that the function does not return a result. The error returned if the request fails. -
Resume(in *jobsv1beta.Pipelines, out *jobsv1beta.Empty) error- The arguments: the first argument is aPipelines, which contains one repeated (list) field with thestringnames of the queues to be resumed; the second argument isEmpty, which means that the function does not return a result. The error returned if the request fails. -
List(in *jobsv1beta.Empty, out *jobsv1beta.Pipelines) error- The arguments: the first argument is anEmpty, meaning that the function does not accept anything (from the point of view of the PHP API, an empty string should be passed); the second argument isPipelines, which contains one repeated (list) field with thestringnames of the all available queues. The error returned if the request fails. -
Declare(in *jobsv1beta.DeclareRequest, out *jobsv1beta.Empty) error- The arguments: the first argument is anDeclareRequest, which contains onemap<string, string>pipeline field of queue configuration; the second argument isEmpty, which means that the function does not return a result. The error returned if the request fails. -
Stat(in *jobsv1beta.Empty, out *jobsv1beta.Stats) error- The arguments: the first argument is anEmpty, meaning that the function does not accept anything (from the point of view of the PHP API, an empty string should be passed); the second argument isStats, which contains one repeated (list) field namedStatsof typeStat. The error returned if the request fails.
From the PHP point of view, such requests (List for example) are as follows:
use Spiral\Goridge\RPC\RPC;
use Spiral\Goridge\RPC\Codec\ProtobufCodec;
use Spiral\RoadRunner\Jobs\DTO\V1\Maintenance;

$response = RPC::create('tcp://127.0.0.1:6001')
    ->withServicePrefix('jobs')
    ->withCodec(new ProtobufCodec())
    ->call('List', '', Maintenance::class);